

SEASON 02 EPISODE 02
The versatility of 3D printing for device fabrication
1st June, 2026
Hemdeep Patel, Robin Boshoven, Dr. Dario Bogojevic, Niloofar Ghasemzaie and Stephanie McGinnity
Podcast Summary
This episode of Big Ideas at Microscale features Dario, manager of the Microfabrication Core at Unity Health Toronto, along with graduate researchers Niloofar and Stephanie from Dr. Scott Tsai’s lab at the iBEST Institute. Together they explore biomedical microfluidics and how 3D printing, especially the CADworks3D ProFluidics printer, is supplementing traditional photolithography and soft lithography. Stephanie discusses generating nanobubbles for contrast-enhanced ultrasound imaging, while Niloofar describes fabricating alginate fibers for tissue engineering scaffolds.
The episode highlights how 3D printing solves fabrication bottlenecks like clogging and device durability, where its resolution limits still favor traditional cleanroom techniques, and why additive manufacturing is reshaping microfabrication workflows for labs lacking extensive photolithography infrastructure.
Available On :



"There was a very labor intensive process of making these devices. So we thought, how about we incorporate 3D printing?"
Transcript
Transcript
Hemdeep (00:15) Hi there, welcome to Big Ideas at Microscale. My name is Hemdeep, I am co-founder of CADworks3D and Resinworks3D. My co-host Robin, Robin, how are you?
Robin (00:29) Good, I’m good. Like you said, I’m Robin. I’m also a co-host and I’m the technical writer on the marketing team at CADworks3D.
Hemdeep (00:38) And so today we’ve got a team from an institution that’s very close by. In fact, I used to work downtown for the better part of close to 20 years and used to always walk up and down the street adjacent to this place. It was St. Michael’s Hospital, which has had new name changes, I had the opportunity, while I was there, to first talk to Dario, who leads the microfluidic manufacturing division at what used to be St. Michael’s, and I think it’s now Unity Health. I’m sure Dario is going to sit down and explain all the inconsistencies and all the changes that have been happening there. Along with him will be joined by Stephanie and Niloofar, who are part of the team from Dr. Scott Tsai’s lab, and they’ve got some very interesting research they’re doing, I’ll have them describe it. So why don’t I bring them on board. Dario, Niloofar, Stephanie, welcome.
Stephanie (01:53) Thank you so much for having us.
Dario (01:54) Hello. Thank you.
Hemdeep (01:56) Yeah, so Dario, why don’t you give us your CV and what you do at this lab, and I guess everything pertaining to microfluidics.
Dario (02:08) I work as a microfabrication specialist at the Research Core Facilities Department at St. Michael’s Hospital Research Institute. Yes, we are part of Unity Health Toronto, but still St. Michael’s Hospital. We also have a partnership with Toronto Metropolitan University and the iBEST Institute. So we offer facilities, expertise, and training to our users here at the Research Core Facilities. The core that I’m representing is called the Microfabrication Core, specialized in microfluidic device design, development, and small-scale manufacturing. We also have analytical equipment, and we offer some 3D printing capabilities and a laser cutter. That’s what we have here.
Hemdeep (03:07) I think the first time that we spoke was in 2019 or so. I think at that time you had come to our office when we were downtown. What was it at that time that you were looking at? Was there a need that you guys were seeing, or was it just curiosity about how 3D printing could work for you?
Dario (03:32) It was both. That was an early stage of the core I’m representing here, we were still in kind of a construction phase, looking for new equipment. At that point 3D printing for microfluidics was at a very, very early stage, but it sounded like something big and promising coming in the field. So I found your company, it was basically the neighborhood, and that’s how it started. There weren’t that many companies in the field at that time.
Hemdeep (04:16) Yeah, that’s true. Niloofar, how about you?
Niloofar (04:27) So, as you said, I’m Niloofar. I’m finishing up my PhD in biomedical engineering, just finished my fourth year, and in a few weeks or less it’s going to be my PhD defense. I haven’t studied yet, but from next week I’m going to study on the material and everything. So far, no worries. My supervisor is Dr. Scott Tsai, as you said, and our lab is at iBEST, which I’m really grateful for, I always say we shouldn’t take for granted that our lab is at iBEST, because iBEST has kind of everything, and also some really amazing people. There are lots of different labs working on different things, so it’s really amazing that you can collaborate with different people and have a really good project because everyone is from a different expertise. So for the first time, with Dr. Scott Tsai, I started working on microfluidics, and Dario was the one who first taught me how to use the clean room to make microfluidic devices using soft lithography. And again, Dario was the one who introduced 3D printing into our project.
Hemdeep (06:05) Amazing. So how about you, Stephanie? What is your experience and how do you fit into iBEST and the lab there?
Stephanie (06:14) Yeah, for sure. Like you said, my name is Stephanie. I’m a recent graduate from the Biomedical Engineering undergraduate program at Toronto Metropolitan University. I graduated this past April, and I recently began my master’s degree under the supervision of Dr. Scott Tsai. I’m also co-supervised by Dr. Michael Kolios at TMU. Same as Niloofar, Dario was the first person who introduced me to clean room operations, photolithography, soft lithography, and recently he’s trained me on how to use 3D printing for microfluidic applications as well. In Dr. Scott’s lab, we do a lot of microfluidics work, so my project also focuses on that.
Hemdeep (06:59) Amazing.
Robin (07:03) What is the connecting point between TMU and St. Mike’s Hospital? Is that how it works?
Dario (07:08) Yes, that’s a partnership between St. Michael’s Hospital and TMU.
Robin (07:14) Okay, so you’re training a lot of students in that case, Dario.
Dario (07:17) We have quite a few groups here that are interested in microfluidics and microfabrication.
Robin (07:24) And Stephanie and Niloofar, you’re saying that the first time you were introduced to 3D printing, that was through Dario, right?
Niloofar (07:33) Yes, exactly. He was also the one who talked about getting a grant for 3D printing and asked for my help to make some fibers using the 3D-printed device sample he had to write the grant with. He was successful in getting the grant and bought this amazing 3D printer that helps lots of people right now, the students at iBEST.
Robin (08:01) Were you using a different technology before 3D printing? For example, Niloofar, you’re doing fiber fabrication. Stephanie, is it microbubbles or nanobubbles, or both?
Stephanie (08:10) Yes, we microfluidically generate microbubbles, but these microbubbles shrink down to nanobubbles. The final product is a batch of monodispersed nanobubbles. So a little bit of both, they’re hand in hand, really.
Niloofar (08:23) So both.
Robin (08:31) When you first started your research, did you already know that 3D printing was maybe the direction you were going to take, or did you come to Dario and say, “this is what I’m working on, what are my options?”
Stephanie (08:45) For my case, my supervisor was actually the one who suggested we try using 3D printing, because the traditional mechanism of making our microfluidic devices, using photolithography, soft lithography, is a little tedious. We thought it might optimize the procedure if we could translate it into a 3D-printed platform.
Niloofar (09:07) For me it was Dario who suggested that. Also, the way I spent the first two years of my PhD was mostly on making the microfluidic device, most of the time I wasn’t doing the experiment, I was making the device. For days I was just filing glass capillaries and stuff. So it helped me so much, for me it was just about making device fabrication easier.
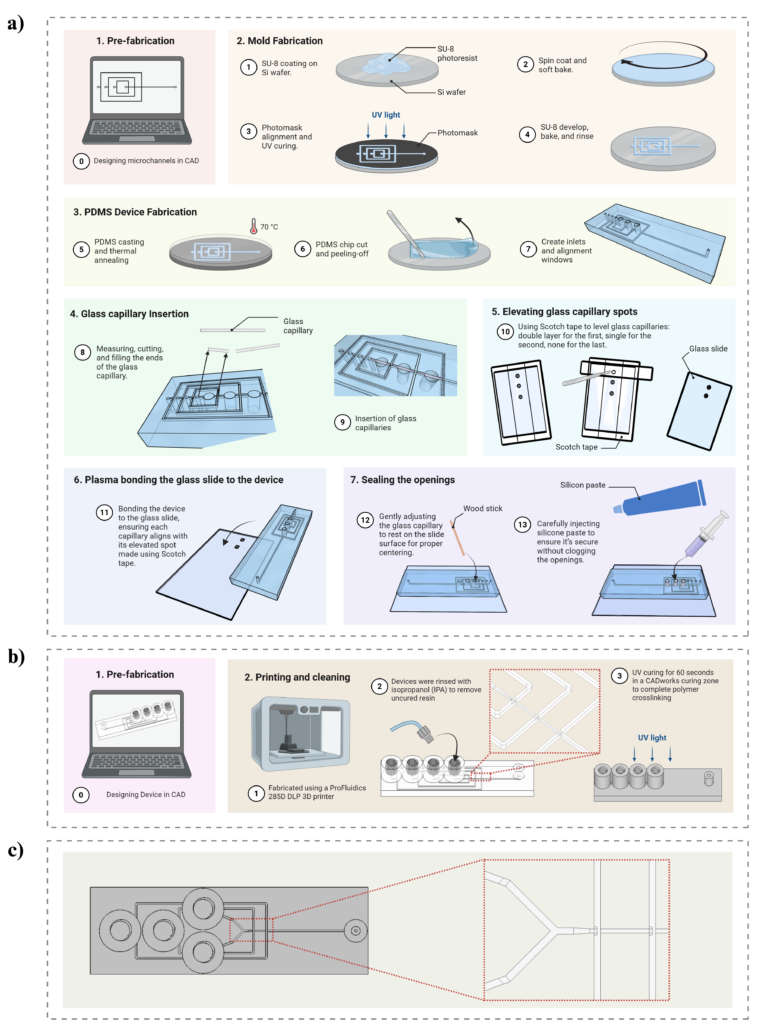
Dario (09:40) Yeah, the idea comes from the project Niloofar is doing. It was a very labor-intensive process of making these devices. So we thought, how about we incorporate a 3D printer in general, even before knowing about those ultra-high-resolution 3D printers used for microfluidics, and maybe combine it with capillaries to assemble the device. That’s how it started. Then we ended up using the ProFluidics printer that can print the entire device without combining it with a capillary, which is of course one step further. Now we can print the entire device, including even the connectors and everything needed, simply connecting it to external pumps and tubing to start experiments. I think that helped Niloofar a lot and reduced device-making time significantly. It also enables people without previous photolithography experience to start making microfluidic devices, which is also a very important aspect of having the 3D printer, such as ProFluidics.
Hemdeep (11:11) I do want to touch on all the research you guys have been doing, but if we take one step backward, before knowing about this existing 3D printing platform, what were the original steps like? What was involved in making these capillaries and the devices you were working with?
Stephanie (11:35) I can speak to my experience first. For my devices I didn’t really need to integrate any capillaries, it’s a little more simplistic than Niloofar’s devices. Making the microplate device, I first used photolithography to fabricate a silicon wafer where the microfluidic channels were patterned onto it. This was a clean room procedure that takes a lot of time, there would be a CAD design fabricated onto the wafer. Then I would use that one wafer time and time again to make my actual PDMS-based devices, using soft lithography: liquid PDMS is poured over the wafer, cured, and then peeled off, leaving the channels transferred onto a PDMS block.
Hemdeep (12:24) In terms of time, how much time did you put into that, a few days, a couple of weeks?
Stephanie Fabricating the wafer itself usually takes about a day in the clean room to fully complete. Soft lithography is something I need to repeat every single time I run an experiment, I can’t reuse one single device, I have to continuously make new ones. We also have to bond them to glass slides so the channels are enclosed, and I have to make my channels hydrophilic as well, which requires additional treatment. So that’s something I repeat every time I run experiments, taking about an hour before each one.
Hemdeep You said it’s a little more simplistic in design, but did you need a lot of small design changes and changes to the silicon wafer that delayed things for you?
Stephanie Partially. The design I use is kind of standardized for my protocol from previous students in my lab, so I’m grateful I didn’t have to go through a lot of iterative design like that, I don’t have to do a lot of CAD iterations. But I know with photolithography, it can be pretty tedious when you do have to iterate a single device, since you’d have to repeat the whole photolithography process over and over until you get it right. That can be very time-consuming. For me it was fine.
Hemdeep That’s great. Could you explain a little about your device design and its applications?
Stephanie Of course. My device design is essentially a flow-focusing geometry. I have two inlet channels, one is a dispersed phase, a gaseous phase, and a continuous phase containing a lipid solution. Bubbles generated from the flow-focusing orifice pinch off as microbubbles shelled by this lipid solution. We use a gas composition of a low-solubility and a high-solubility gas mixed together, which facilitates dissolution of the high-solubility gas and allows my microbubbles to shrink to very small nanobubbles. Because we’re using microfluidics, the final size distribution is very monodispersed and uniform in size, which is ideal for applications. These bubbles are used in contrast-enhanced ultrasound, they can be injected into the bloodstream to enhance contrast of the blood pool in the body. Nanobubbles aren’t quite clinically implemented yet, but microbubbles already are. We’re interested in monodispersed nanobubbles because, in the body, they demonstrate the potential to enter extravascular space and expand applications beyond the bloodstream.
Hemdeep (15:38) By what factor do these bubbles shrink from micro to nano size?
Stephanie (15:47) There’s a critical diameter they need to be initially to facilitate complete nanobubble dissolution. Above that critical diameter, it depends on factors like the concentration of the solution, larger bubbles will shrink by a known, predictable factor, like 10 times. Below that critical diameter, they’ll always shrink down to about 200 nanometers in diameter, which gives us really great monodispersity, a really tight size distribution centered around 200 nanometers, which is great for controlling their response under ultrasound.
Hemdeep Does the size of the flow-focusing channel affect how much it shrinks?
Stephanie Not so much the channel itself, but the flow-focusing orifice plays a big role, because ultimately the size we can make the microbubbles at is dictated by the width of that flow-focusing orifice.
Hemdeep (16:57) Using 3D printing, how small are you able to get some of these bubbles?
Stephanie (17:07) This is one area where I’ve had the most struggle. Fabricating actual channel geometry on the order of a couple hundred microns has been pretty easy with 3D printing. However, the flow-focusing geometry itself, typically on the order of tens of microns, is a little difficult to fabricate with current resolution abilities. A couple of ways we’ve been thinking about getting around this include maybe integrating a microporous membrane instead of a flow-focusing orifice, that incorporates another fabrication step, 3D printing plus embedding a membrane. We haven’t done this yet; these are just ideas about how to overcome the resolution constraints.
Robin (18:27) How about imaging or analyzing the bubbles, do you use microscope imaging, or a different measurement system, once they’ve been generated?
Stephanie (18:31) While they’re being generated, when we have clear microfluidic resin or PDMS, it’s optically transparent, so we can visualize the bubbles pinching from the orifice, we can see microbubbles under a microscope. But when they shrink to nanobubbles, it’s difficult to visualize with a traditional light microscope. We can visualize the bubbles using TEM imaging, though that doesn’t gather population characteristics well. Mostly we rely on resonant mass measurement, it uses a cantilever with a microfluidic channel embedded inside it that resonates. As bubbles pass through, depending on their mass, the resonant frequency changes slightly, which lets us derive characteristics of the nanobubbles. Dario might be able to speak more to this, since this is a device we actually have at iBEST.
Dario (19:29) That’s an interesting and pretty unique analytical instrument. It’s based on a microfluidic sensor that can detect particles based on their buoyancy, which is preferred when analyzing nanobubbles because you want to clearly distinguish between the bubbles and residual lipids. Since this instrument can recognize buoyancy differences, positive or negative, you can clearly see which particles are bubbles because they’re positively buoyant, versus other, negatively buoyant particles that would sink or float differently.
Stephanie (20:15) So it allows us to get around the constraint that they’re so small we can’t see them under a microscope.
Hemdeep (20:23) Dario, in your lab right now you’re bringing a lot of tools together to help researchers. What additional tools do you have that a typical researcher team would use?
Dario (20:40) We have a 10,000-class clean room, ISO 7, specialized for photolithography, with a standard mask aligner, a maskless aligner tool, an optical profiler, and of course a wet bench with spin coaters and hot plates, everything needed for traditional standard photolithography. We also have a suite of analytical equipment. I mentioned the Archimedes, we focus on particle analysis, since most of our users are in nanotechnology or making nanobubbles, lipid nanoparticles, or other types of nanoparticles. We provide instruments such as DLS, and most recently we got NTA. We have advanced spectrofluorometers, spectrophotometers, cell counters. On the 3D printing side, we have a standard Mark II extrusion-type printer, and the ProFluidics that we got more recently for microfluidics printing. We also have one laser cutter. The Microfabrication Core is part of Research Core Facilities, and we have another five cores specialized in flow cytometry, imaging, and histology, we’re all situated in the same building. We have four floors, and each floor has one or two cores specialized in some area.
Hemdeep (22:44) And that’s all at the Li Ka Shing building.
Dario (22:47) In the Li Ka Shing building, downtown Toronto, very close to the Eaton Centre.
Hemdeep (22:53) Dario, when researchers throughout that building look at 3D printing, do they see it as an alternative to the clean room, or do they build their project based on going to 3D print it from the start?
Dario (23:17) We have users who use the 3D printer, ProFluidics, as an alternative to the clean room, for a few reasons. First, it doesn’t require photolithography skills and knowledge. It can also reduce the cost of materials. And probably most important is time, as Stephanie already mentioned, you can get a ready-to-use device in a matter of two or three hours, and 3D printing is pretty much a walk-away process. We also have very experienced photolithography users for whom time and cleanroom access aren’t really the problem. Depending on the device, photolithography could be one to two hours, comparable to 3D printing, up to a whole day, as Stephanie mentioned. What those users are looking for is something they can’t do with photolithography, some geometries that are impossible or very difficult to achieve with a standard photolithography process. That’s the case, for example, with Niloofar’s device using the capillary, where we printed 3D-shaped nozzles that helped establish the core of the fiber required during the flow-focusing process to extrude the fiber out of the device. That helped significantly with getting the device, previously we’d need to insert capillaries inside the PDMS device, which was very tricky, and repeatability wasn’t great. Here we have a device in a matter of two or three hours, without any additional fabrication work, simply a plug-and-play device where you connect the tubing. Another appealing aspect of 3D-printed microfluidics is that you can print connectors as part of the device, you can connect simple tubing or tubing with threaded fittings with no problem. We’ve tested that with multiple devices and it worked really well.
Hemdeep (26:07) When most people come in, are they wanting clear resin or PDMS? I know you’ve mentioned researchers building their own photopolymer with specific characteristics, is that the type of thing?
Dario (26:27) That’s still an ongoing project, but primarily we use CADworks resins, including the clear one, which is a favorite because people get a ready-to-use device. But we do have users making PDMS master molds out of what I call the green resin. That’s also interesting because, not only does it save time compared to microfabrication with standard photolithography, but you can easily create multi-layer devices, of course within resolution limits, but with the green resin I believe we’re down to 50 microns in XY. And that doesn’t take any more time than doing a single layer. Everyone who’s done photolithography knows that making multi-layer devices is usually time-consuming and can take all day in the clean room, especially aligning multiple layers. Here, technically, there’s not much difference between one layer on your master mold and a multi-layer device. That’s a very useful aspect of using a PDMS master mold. Of course there are still resolution limitations compared to photolithography, with photolithography, using SU-8 and soft lithography techniques, we can easily go down to maybe five-micron features.
Robin (28:18) Stephanie, out of curiosity, which material were you using to build out your generators?
Stephanie (28:30) I was also using the clear microfluidic resin. For my purposes it’s really helpful to visualize the initial size of the microbubbles under the microscope while they’re being generated, so a clear material lets me make sure everything is up to par before I start collecting and characterizing them. But it might also be beneficial to use the green material for the resolution improvements, so it’s kind of a balance between the two for me.
Hemdeep (29:04) How important was maintaining really good laminar flow in your devices, Stephanie, to standardize the size of bubbles you were getting?
Stephanie (29:16) Pretty important, the stream of bubbles being produced needs to be very smooth and consistent; the size coming out of the orifice needs to be very consistent. That’s also why it’s important to monitor for obstructions. Even the hydrophilicity of the channels really influences how smooth the stream is. Because there’s a critical diameter, every bubble below it can shrink to a nanobubble, bubbles above it can’t, if my bubbles fluctuate in size coming out of the orifice, I might not get a high concentration of bubbles in the end, or I might get a wider distribution, which isn’t ideal.
Hemdeep (30:06) You mentioned hydrophilicity, how did you modify that on the clear resin itself?
Stephanie (30:15) Traditionally with PDMS, I use oxygen plasma to induce hydrophilicity. I haven’t actually generated bubbles within the resin device yet with hydrophilicity induced, but I did put a pre-made resin device in my oxygen-plasma cleaner for about 30 seconds and put a droplet of water on the surface, I noticed a big difference in the contact angle, so it definitely induced hydrophilicity on the surface. Since the channels are open as well, I’d speculate it also improved the hydrophilicity of the channels, since the inlets are open to the atmosphere.
Robin Were there any other surface modifications you had to do besides hydrophilicity?
Stephanie (31:09) Not really for me, I don’t do any cell culturing with my devices, so hydrophilicity is the main thing.
Dario (31:17) We have another project where a user is interested in hydrophobic surfaces. The clear resin is hydrophobic by itself, but for droplet generation using fluorocarbon oils, you need silanization to make it more hydrophobic. That’s something we’re also looking into, based on literature and discussion with CADworks3D, it seems doable, and channels can be silanized similarly to PDMS, making them suitable for droplet generation using FC oils, which is a very common application in droplet microfluidics nowadays.
Hemdeep (32:22) Stephanie, you did all your undergrad at TMU?
Stephanie (32:26) Yes, I did. I began undergrad in 2021, during COVID, things finally opened up around my second year, and I finished in 2025.
Hemdeep (32:38) I don’t know if you know this person, her name is Helen Molino.
Stephanie (32:46) She’s in Dr. Kolios’s lab, my co-supervisor is Dr. Kolios.
Hemdeep (32:53) I do know her, and I know her family, her uncle is our best friend. I remember talking to her about this last year or so; I think she’s doing some work at McMaster.
Stephanie I believe she did her master’s at a different school, maybe McMaster, and at the same time I began my master’s, she came in as a PhD student. Dr. Kolios is also her supervisor, I’ve seen her in the lab this year.
Hemdeep What’s the area of research Dr. Kolios is particularly in?
Stephanie (33:51) He’s in the physics department at TMU, and his lab does a lot of ultrasound work. I’m an engineering student, so my primary supervisor is Dr. Tsai in an engineering lab, but because my bubbles have applications in ultrasound contrast enhancement, that’s where I go with related questions.
Hemdeep (34:13) Dario, where did you study? Where did you do a lot of your work?
Dario (34:18) I got my undergrad and master’s from the University of Belgrade in Serbia, then finished my PhD at the University of Edinburgh in Scotland. I then worked here at the University of Toronto as a postdoc with Professor Aaron Wheeler, and later with Professor Milica Radisic, before getting this job as manager of the core facility.
Hemdeep (34:56) I recognize the name Wheeler, he’s at U of T?
Dario (35:02) Yes, both are at U of T. Aaron is famous for digital microfluidics. Radisic’s lab works mostly in tissue engineering, and they also use microfluidics a lot.
Hemdeep (35:25) I think Wheeler uses our platform through CRAFT.
Dario (35:36) Yes, they’re both users of CRAFT, and I believe both are co-directors of CRAFT.
Hemdeep What was your area of study while you were at Edinburgh before you came here?
Dario (35:55) Microfluidics, but in the area of heat transfer, I was studying a small heat exchanger built on microfluidic channels in a silicon wafer, with potential applications for electronics cooling. The project was about boiling in microchannels, the core focus was two-phase flow, including boiling in the channel. It was quite explosive; I went through many, many chips before I finished.
Hemdeep What kind of substrates were you using for your microfluidic devices?
Dario Silicon wafer.
Robin (36:54) When was your introduction into 3D printing, Dario? Was it only when you worked at St. Michael’s, or already during your studies?
Dario (37:03) During my postdoc I started using 3D printers for standard filament FDM printing for everyday lab applications. For microfluidics specifically, this was our first printer, but I got interested very early when I started this position managing the microfabrication core. I was aware of several companies, there weren’t that many at the time, I’m not sure about now, there are probably more coming. We received samples about seven or eight years ago, including samples from Hemdeep, which helped us evaluate possibilities and later use some of that preliminary data to apply for a grant, which was successful. That’s how we secured funding to get a printer at the institute.
Hemdeep (38:20) Yeah, that’s true. Niloofar, how about you?
Niloofar (38:23) Besides microfluidics and fiber generation, which are the main fields of my PhD, Scott’s lab also works on bubbles and on ATPS, aqueous two-phase systems, which is like water and oil, except in this case both phases are aqueous. That’s for biomedical engineering with biological materials, so it’s a safe, non-toxic environment, and if you make dry carriers or scaffolds at the end, you don’t need washing steps to remove oil. For fiber generation, you need distinct phases to make a fiber that’s uniform, which is why we needed the two-phase system, instead of oil, since Scott is working on ATPS, we thought, why not make fibers? For my PhD, we wanted to introduce a new technique to make different shapes of fibers more easily with only one device, instead of going to the clean room and changing the design each time. If your goal is to make solid fibers, you use the same device; if you want hollow fibers, you use the same device, just with different input solutions. We also showed that by changing pressure you can change the dimensions of the fibers, and at the end they’re pretty uniform. Another type we made was droplet-filled fibers, droplets inside the fiber that can contain drugs released over time, or encapsulate cells. That was the whole idea for my PhD.
For the microfluidic device, we first went with soft lithography, which is really amazing, one of the good things about it is how clear everything looks under the microscope. But the issue with soft lithography is that the design is 2D, you can’t have a complex 3D design. Since I needed coaxial channels to make fibers, it wasn’t possible to just create a mold once and be set. I had to insert glass capillaries afterward, which was really difficult, I don’t think we’ve found any technology cheap enough for a lab to give you exactly the size of glass capillary you want with really fine edges. I had to measure it with my hands, cut it very short, find the glass capillary I could barely see, wash it carefully to make sure no glass particles were inside the channels, and then insert it myself, you can’t use tweezers because it’s glass and you shouldn’t apply much pressure, so you use your hands, then move it around a bit with tweezers. In the end, the nozzle wouldn’t be exactly the size I wanted for every device, and the resistance in the channel depends on that. Afterward I had to use silicone paste to secure the opening where I inserted the capillary, too little paste and there’d be leakage, too much and it might kill the whole channel. After spending days making devices, I had to throw away 50% of them. It was really frustrating. And with the first experiment, of course, microfluidics is prone to clogging, I think someone needs to spend their PhD on fixing the clogging problem with glass devices.
Robin (44:10) It’s crazy, so close.
Niloofar (44:32) Like those heart surgeons using angiography tools that can be inserted into a channel to open it, something like that.
Robin That’s it.
Niloofar (44:57) It creates issues, it’s also a PDMS issue, things are prone to attaching to it, especially for me, since I was using alginate, which gels and attaches to the surface if it touches it, so you have to wash it carefully to reuse it. That was all the issue I had that made me want to change my next project, to not use this device, to use something else, create new ideas, which thankfully we ended up doing with a 3D printer that helped me a lot.
Hemdeep (45:33) So when you look at 3D printing, you were trying to replace the current system because it was painful, and it sounds like you really struggled getting glass capillaries in place. What was the base minimum feature size you needed a 3D printer to deliver in order to mimic what you were already getting using the clean room?
Niloofar (46:07) The only important thing was having those nozzles that act as the glass capillary, that at the junction, when the other liquid solution comes in, there’s something preventing the solution from touching the walls. That was the only important thing. Even though a glass capillary is a round channel and even if a printed one was square, because of the pressure it would end up as a round rod, a fiber. The only thing that mattered to me was the nozzle being exactly like the glass capillary one. Because we’re using pressure, by increasing the pressure at one of the inlets, you can squeeze your fiber, it wasn’t an issue if we couldn’t get channels smaller than 100 microns. If I wanted really thin fibers, I could just increase the pressure. So the only thing that mattered for me was the nozzle.
Hemdeep (47:38) As you were increasing the pressure, was having very good laminar flow important, or could you overcome that issue?
Niloofar (47:47) Laminar flow is really important, and even at the range a 3D printer gives me, it’s fine, because for my device I need pretty big channels, with soft lithography the height was around 600 microns and the width was about 450. Here we tried around, I think, less than 200, maybe 150 for the first channel, so that was fine for me, which is why it was really helpful for my project. Another advantage I found during the experiment was that the material, the alginate, fibers don’t attach to the surface when they gel, so it was way easier to wash the whole device than the PDMS one. The only issue was that under the microscope it wasn’t always clear to see the phases, sometimes the devices were a bit opaque and had residues on the surface that were hard to see. But overall the whole thing had more advantages for me.
Robin (49:32) Did you end up doing any surface modifications to help you see clearly in the device?
Niloofar (49:36) Not yet. It was more a case of making multiple devices, and sometimes one wasn’t clear enough. It had edges that made it hard to tell if what I was seeing was the distinct phases of my solutions or just edges of the device. But most of the time they were clear enough to see my phases and be able to work.
Hemdeep (50:19) In terms of length, what kind of lengths are you trying to produce these fibers/threads in?
Niloofar (50:25) For diameter, I haven’t tried more than 500 microns, but I think that’s achievable if you have wider channels, that’s the limit of the channel. Or you can make thinner fibers by applying more pressure. In terms of length, fiber generation is ongoing, it’s one continuous thread that’s running, and you can cut it whenever you want, so the length is pretty much unlimited.
Hemdeep (51:19) What are the potential applications for this technology you’ve created?
Niloofar (51:26) My master’s background is in tissue engineering. In tissue engineering, the main component for making a functional tissue is the template or scaffold, which needs to mimic the environment cells have in the body. If you want to make a liver-like tissue, you have to give them the same feeling, texture, structure. Most cells in our body, besides blood cells, are surrounded by extracellular matrix, which is filled with fibers, collagen fibers, elastin fibers. So cells like environments and scaffolds in the shape of fibers, which is why there’s a lot of research and techniques in tissue engineering trying to make fibrous scaffolds. You could use scaffolds based on the chemical you’re using, here I’m using alginate, or you could make dextran methacrylate fibers, gelatin methacrylate fibers, and the application would change based on the dimension, size, and shape of the fiber. For me, the whole goal was to introduce a new technique, but in general those fibers can be used for wound healing, since alginate is a chemical used a lot in wound healing. For hollow fibers, one interesting piece of research co-cultured fibers with endothelial cells in the core of the hollow fiber and muscle cells on the outside; over time the fibers degrade, showing that new vessels can form and that angiogenesis is possible this way. But the whole purpose is to make a fibrous scaffold for cells.
Robin (54:33) When you’re fabricating the fibers, is biocompatibility of the device an important characteristic? Did you have to do anything to make sure the device was biocompatible, or run any biocompatibility tests?
Niloofar (54:41) [laughs] Actually, I’m surprised no one on our paper’s review raised this in revisions…
Hemdeep (55:06) Okay, we will not release this podcast until you defend it, so no one figures out these are questions they have to ask you.
Dario (55:14) I think the way the fiber is made, because it’s shielded by a two-phase flow, the core phase that could theoretically come into contact with the material of the device doesn’t actually get into contact with it. Plus the residence time of the material inside the device is relatively small, so I don’t think there’s a significant possibility of contamination. Second, we haven’t done any cell work with these fibers yet, that’s the next step. We’re just finishing a paper that will hopefully be published soon, but that’s only about creating the fibers as a proof of concept using these 3D-printed devices.
Niloofar (56:09) With the previous PDMS device, I encapsulated cells inside the fiber. As Dario said, even if there’s some toxicity, given the residence time in the channel, really fast, milliseconds, the cells might briefly touch the surface as they enter the channel, but it’s really fast and quickly shielded by the next phase. That’s something we have to test in the future, of course.
Dario (57:04) We also plan to test different kinds of resin with better biocompatibility than the current resin, while achieving the same transparent device with the same level of features.
Hemdeep (57:25) I think the CytoClear resin would be perfect for that.
Dario (57:27) That would probably be the next step.
Hemdeep (57:34) So I think we could easily say, Niloofar, that you did not fully defend your PhD quite well here.
Robin (57:43) This is why this is practice, good timing.
Hemdeep This is your practice round.
Niloofar (57:47) Exactly, I was thinking that.
Hemdeep (57:53) You also mentioned a couple times being able to change the shape of the fiber, like a triangle or something?
Niloofar (58:11) No, not a triangle, I don’t think a nozzle with a different shape would help, because the shaping has to happen exactly at the moment of extruding and gelation, when the material contacts the cross-linker and keeps its shape. What we’re doing is using the nozzles just to keep the phases apart from the wall, and after that, because of the pressure, they form a round shape. So not different shapes with my device, I mean, we made hollow fibers, core-shell fibers, Janus fibers, and droplet-filled fibers, but besides core-shell being core-shell, all of them end up round.
Hemdeep (59:11) You also mentioned encapsulating cells, what other particles could you encapsulate, and what would be the application?
Niloofar (59:22) Anything, any drug, any kind of particle, can be encapsulated inside. One interesting thing about the Janus fibers, where one side is one material and the other side is another material, which we created with the 3D printer using a Y-shaped channel, is you can add one type of drug in one half and another type in the other half. I recently read a paper about wound healing: in the first stage you need certain drugs to promote certain cells, and after one to three days you move to a completely different stage needing a different drug and environment. With core-shell particles, we made core-shell droplets, my next step after fibers, the shell can be loaded with one drug and the core with another, controlling drug release and degradation of the shell and then the core to be optimized with the stages of wound healing. For the first three days the shell continues to degrade and release its contents, and after three days, once it reaches the core, a different material and drug is released. That could be one application.
Dario (1:01:47) I think that versatility of fibers is a very important aspect. We can tune the fiber diameter, as Niloofar mentioned, using different flow rates and pressure settings on our supply materials. We can also make hollow-core fibers, droplet-embedded fibers, and Janus fibers, which, for those unfamiliar, resemble those multicolor toothpastes; we can make a fiber with a few colors, at the range of 100 microns or a few hundred microns.
Niloofar (1:02:39) The “Janus” name comes from the Greek god Janus, who had two heads, so scientists use it for droplets, nanoparticles, and fibers where exactly half is one material and the other half is something else.
Robin (1:03:14) Ha ha.
Hemdeep (1:03:16) Okay, so we’ve gone full circle, from Korean barbecue, Japanese barbecue, some other type of barbecue, to Janus.
Hemdeep (1:03:27) Greek mythology, Janis Joplin.
Niloofar (1:03:32) Proof that we’re not just scientists, we have a life too.
Robin (1:03:37) Personalities outside of them.
Niloofar (1:03:39) Sometimes touch the ground and go back to the lab.
Robin (1:03:44) [laughs]
Dario (1:03:46) I think using a 3D printer now allows people to spend more time outside instead of being in the clean room.
Niloofar (1:03:57) Yeah.
Robin (1:03:58) They have more time now.
Dario (1:03:59) I can finally have some social life.
Robin (1:04:01) I think you guys already touched on the next steps for you. Does 3D printing still fit in there? Are there certain advancements you’d want in 3D printing to help bring you to that next step?
Stephanie (1:04:30) I can speak to this. For my devices, the flow-focusing geometry is the most difficult thing to fabricate, to completely translate from soft lithography to 3D printing. In the future, with resolution improvements, I think it will really help accessibility for the kind of research I do with microfluidic bubbles, generating devices more efficiently, and could let us completely eliminate clean room reliance, which would be the ultimate goal. There are a lot of different ways nanobubbles are generated, a more common way is taking a vial and shaking it (called agitation), which makes a bunch of bubbles, but they’re polydispersed, ranging from microbubbles all the way to tiny nanobubbles, which isn’t ideal. Microfluidics offers monodispersity, but it’s not super widely studied, I think one of the biggest reasons is the access to the clean room and the long, tedious procedure versus just shaking a vial. If 3D printing can completely replace this photolithography/soft-lithography dependence, that would really be important for advancing this field into preclinical and clinical studies with the bubbles.
Niloofar (1:05:51) For me too, one issue we had was that the channels couldn’t be placed really close to the surface; I think they had to be about half a millimeter away or so. With the inverted microscope, when we want to look at the flow from the bottom of the device, the objective needs to get close to the channels, and that was an issue. Also, if the device could be more clear/transparent to see inside the channel, that would help, specifically for me, since I have multiple phases inside the channel. We recently made a microfluidic device with five inlets, so I’d have four phases inside and need to see the interface of each one, it’s kind of hard, and sometimes I have to guess. But overall, since I don’t have to cut glass capillaries anymore, I’m still okay with it, if that resolution/clarity issue could be fixed, I’d be happy.
Robin (1:07:22) Very important question, how many glass capillaries did you break?
Niloofar (1:07:33) So many. But when you buy glass capillary, it comes with so many of them, and you only need a tiny piece for each device, so even breaking multiple is still okay, you just have to be careful they don’t end up in you.
Robin (1:07:53) You’re also underestimating the cost of stress.
Niloofar (1:07:58) For that whole time, I’d be sitting next to the microscope for the whole day, not exaggerating, grabbing a glass capillary I could barely see and doing this repetitive fine work. My friends and family are in different countries and cities, so we’d talk during these tasks, and one time a friend and I were talking for two hours while I was just doing this the entire time. That was my whole life for two years.
Dario (1:08:40) Niloofar’s project is an excellent example of using a 3D printer for applications where it would be very difficult to use standard soft lithography or photolithography processes. That’s something we’re looking into for the future, identifying projects that are difficult or impossible to do other ways than 3D printing. I think that’s a great opportunity.
Hemdeep (1:09:15) I remember seeing the first draft of that STL file when it was sent over for us to take a look at, and I was very curious what on earth this thing was supposed to do and how it all fit together. I’m so glad to have had this opportunity, it really is amazing how the world works. I think we’ve come to the end of this phase of the conversation. I’m so glad I had the chance to talk to all three of you, you’ve highlighted the type of research being done that a lot of people don’t know about. I know I, on the outside, definitely didn’t realize this is the type of complex research being done. It’s amazing that we had a chance to hear about it and about the struggles and successes from your hard work. Thank you very much for coming.
Niloofar (1:10:24) Thank you so much for having us.
Stephanie (1:10:26) Yeah, thank you for having us.
Dario (1:10:27) Thank you for having us.
Hemdeep (1:10:29) And that will end today’s episode of Big Ideas at Microscale. My name is Hemdeep Patel, and my co-host Robin will say goodbye for now.
Robin (1:10:52) [laughs]
Say Hi to our Guest
Dr. Dario Bogojevic @ St. Michael's Hospital
Niloofar Ghasemzaie @ Toronto Metropolitan University
Stephanie McGinnity @ Toronto Metropolitan University
More Episodes
Episode 01
6th April 2026 . Season 2
Hemdeep and Robin chat with Dr. Majid Warkiani from the University of Technology Sydney to discuss the impact of 3D printing in IVF research and fabricating a biomimetic sperm selection device.
Episode 07
6th October 2025 . Season 1
Hemdeep speaks with Drew, Anne, and John from AbbVie’s SPaRCS group, a curiosity-driven, skunkworks-style team exploring how diverse expertise, rapid prototyping, and cutting-edge 3D printing are unlocking new tools for drug discovery.
Episode 06
15th September 2025 . Season 1
Hemdeep and Robin sit down with McGill PhD student Chen Li to explore his academic journey, his research on air-liquid interfaces and epithelial cell differentiation, and the innovative process behind building custom lab setups.